So in the beginning of the summer a close friend of mine got hitched! It was a private sunrise ceremony, and then the couple was whisked away later that AFTERNOON (same day as the wedding) for their relaxing island honeymoon getaway! Reminds you of a fairytale wedding story right? So awesome! I. Am. Jealous. Anyways, the couple is just SO sweet and so selfless... they would do anything for their friends and family and we love them to bits! :) A couple of weeks ago they threw a big party/reception for family and friends to celebrate their marriage, so I was dying to make something extra special for the two newlyweds! The bride is a crafty teacher friend of mine, and just loves loves loves monograms. They also just moved in to a new apartment together, AND their colors for the wedding were yellow/gray/white. Soooooo, put it all together and what do you have? A fabulous new monogram door decor (letter B for the new last name) for their new apartment in their wedding colors! Duh! Isn't that what you were all thinking? :) Here's the "how to".....
Supplies Needed: Glue gun, glue sticks for glue gun, staple gun and staples, yarn (preferably on the thinner side... the thick yarn gets to fuzzy), wooden letter (I used a 13.5 inch), ribbon.... see pics below.


Found yarn at Hobby Lobby for only $4.00.


Found the wooden letter at Hobby Lobby for $3.50.


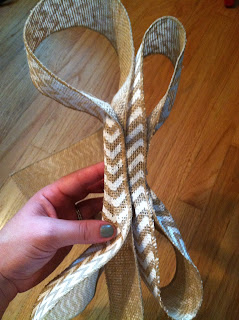
Ribbon was from Hobby Lobby as well, $6.00... but look for their sales and you can usually get it half off, or at least use a 40% off coupon on any of your items. This ribbon was with the burlap material near the floral department. There were other types of burlap ribbon, but I liked this one because it has wire edges which helped hold form when shaping the bow. Plus I loooooved the chevron pattern on it! :)


Step One: I started in the middle of the B and glued the end of the yarn to the back. I wrapped the yarn around the middle horizontally, keeping the yarn in straight lines, working my way up.


Step Two: Once the middle was finished, I started working my way up the top left side of the B. Try your best to keep the yarn bundled as you pull it through the middle hole. Mine got tangled up quite a bit, which was a pain since I had to keep stopping to cut the yarn, glue it in place, untangle the yarn, glue the new end to the back, and continue wrapping...

Step Three: The dreaded corner... this was THE hardest part of the whole thing! Since its such a sharp corner/angle when wrapping, the yarn doesn't want to stay in place. So this involved a lot of gluing on the back, and a lot of overlapping near the middle hole area of the B.

Step Four: Once the "hardest part ever" is finished, the rest is pretty simple! Just keep wrapping alllllllll the way around! Do the top of the B, the entire right side all the way down, the bottom of the B, the bottom left corner (yes this is a difficult area again... just try your best! You had practice on the top left so the bottom left corner is a tiny bit easier) Then wrap it up the rest of the left side until you reach the middle again. I ended by wrapping the center of the B, going through both the top and bottom middle holes. Glue your end in the back, and Ta-Da!


Making the Bow: I made my bow with four different sized pieces of ribbon. I looped the first two pieces around so they formed the "bow part" (shown below). I pinched the middles of each bow and put some got glue in between so they wouldn't loose form.

Then I hot glued the big bow and the little bow together, joining them at the middle pinched sections.
Next I cut the piece that hangs from the bows. I pinched the middle and put some glue to hold the form.

Glue this piece to the bottom of the bows.

Next, I cut a smaller piece to wrap around the middle of everything, to "finish" it off and make it look like I tied this beautiful bow effortlessly with no glue at all. Tricky tricky right!? :)


When attaching the bow to the letter, I folded up the ends so it looks clean and finished. I first hot glued the ribbon to the back of the letter.

Then I added some staples to make sure it was secure!

When done, hang it up and ENJOY! I promise you will get many many compliments! This project was time consuming, but super affordable. And for the couple it was going to? Well worth every minute spent making it! :) Congrats to the newlyweds!

No comments:
Post a Comment