Monday, October 14, 2013

Easy Peesy Halloween Decor!

Happy Monday everyone! :) I just recently whipped up this super easy (and cheap!) outdoor Halloween decoration for the house, posted a pic on Facebook, and all of a sudden my inbox was flooded with comments from people letting me know how much they loved it! I figured I would post a pic here as well, with a quick tutorial on what I did. Unfortunately I didn't take step by step pics along the way... Sorry about that! It's really such an easy project to do, there's not much that can go wrong! :)

So first of all, the only supplies needed for the spider web are a roll of black electrical tape (57 cents at Walmart!) and scissors! I decided to make my own spider out of construction paper (and laminated it so it could go outside) but any spider would work! A 3D one would be kind of cool too! My sister made her spider out of construction paper as well, but she put hers on the inside of the window since she didn't have a laminator. Like I said, put your own spin on it! Anything goes! 

I started on the outer edge of the window when making my 6 lines for the web, and had them all meet in the middle. I wanted my "center" to be off-center because I didn't want it to look too symmetrical. 

Next I started near the intersection of all the lines and I just began to wind my tape around and around and around, to form the web! It was hard to turn the tape as you wound it around, so I ended up using scissors and cut each section separately. I made sure that each line was not spaced exactly the same, and just let it take its own course! 

In the end I put a long piece of tape from the top of the window going down, and attached my spider at the bottom so it looks like he's hanging out by his web. :) 

Hope you enjoy it! Happy Halloween!


Saturday, October 12, 2013

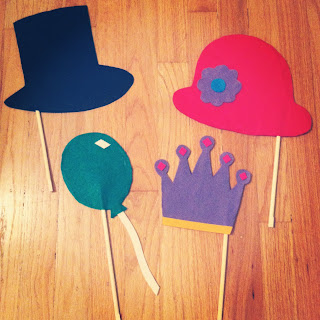
DIY Photo Booth Props

I can't believe my baby is turning one next month! To celebrate the occasion, I am throwing a circus themed party! I will be setting up my own little photo booth for the kiddos, and lets be honest... probably for the adults as well... hehe! I decided to make all of my own photo booth props, since I have so much free time to do this.... ;)
 
Supplies Needed: Elmer's glue, felt, wax paper, scissors, hot glue gun and glue sticks, chopsticks (found at the Dollar Tree)
 
First, I did quite a bit of research on Pinterest and Etsy to see what kinds of props I wanted to make. I knew that mustaches are a big hit, but I wanted a variety of things for the photo booth. Once I decided which ones I wanted, I created my own stencils (freehand) on plain computer paper. Once I was satisfied with the size and shape of my stencils, I used these to trace on to the felt. You will need TWO of EACH shape/item you are tracing, since you will be sandwiching them together.
 
 
After I traced and cut everything out, I layed all of the pieces out on my table, with wax paper underneath them. I needed to make the felt stiff, so the props don't flop down on the stick when in use. You can buy stiff felt, but its way more expensive than regular felt, and I had a ton of felt at home that I didn't want to go to waste. To stiffen the felt, I (practically) poured the Elmer's glue on one side of each felt piece.


I used my finger to spread the glue out evenly. Make sure to cover the entire piece of felt with glue. Once the glue hardens (clear!) it makes the felt much more stiff. And yes, I most definitely covered the palm of my hand in Elmer's glue so I could peel it all off when it dried... like I used to do in middle school. SO. ADDICTING.


After all of your pieces are stiffened, you can start putting the pairs back together! I layed out each pair next to each other, and put hot glue on one piece only. I glued the chopstick in place first, and then put hot glue all over the rest of the piece. Then I placed the other half on top and pressed together.Make sure to press all of the edges together so they don't fray apart, but also be careful that you aren't squeezing out a ton of hot glue in the process!
 
 
Once glued together, with the chopstick sandwiched in between, use your scissors to trim around the edges any parts that didn't line up completely.
 
 
Easy Peesy! Great looking (easy to make) photo booth props! The back drop to the photo booth is amazeballs... and all I did was use shower curtains I found clearanced at Target! Check back next month for a complete low down of Charlies circus party!


DIY Door Decor!

So in the beginning of the summer a close friend of mine got hitched! It was a private sunrise ceremony, and then the couple was whisked away later that AFTERNOON (same day as the wedding) for their relaxing island honeymoon getaway! Reminds you of a fairytale wedding story right? So awesome! I. Am. Jealous. Anyways, the couple is just SO sweet and so selfless... they would do anything for their friends and family and we love them to bits! :) A couple of weeks ago they threw a big party/reception for family and friends to celebrate their marriage, so I was dying to make something extra special for the two newlyweds! The bride is a crafty teacher friend of mine, and just loves loves loves monograms. They also just moved in to a new apartment together, AND their colors for the wedding were yellow/gray/white. Soooooo, put it all together and what do you have? A fabulous new monogram door decor (letter B for the new last name) for their new apartment in their wedding colors! Duh! Isn't that what you were all thinking? :) Here's the "how to".....
 
Supplies Needed: Glue gun, glue sticks for glue gun, staple gun and staples, yarn (preferably on the thinner side... the thick yarn gets to fuzzy), wooden letter (I used a 13.5 inch), ribbon.... see pics below.


Found yarn at Hobby Lobby for only $4.00.


Found the wooden letter at Hobby Lobby for $3.50.


Ribbon was from Hobby Lobby as well, $6.00... but look for their sales and you can usually get it half off, or at least use a 40% off coupon on any of your items. This ribbon was with the burlap material near the floral department. There were other types of burlap ribbon, but I liked this one because it has wire edges which helped hold form when shaping the bow. Plus I loooooved the chevron pattern on it! :)


Step One: I started in the middle of the B and glued the end of the yarn to the back. I wrapped the yarn around the middle horizontally, keeping the yarn in straight lines, working my way up.


Step Two: Once the middle was finished, I started working my way up the top left side of the B. Try your best to keep the yarn bundled as you pull it through the middle hole. Mine got tangled up quite a bit, which was a pain since I had to keep stopping to cut the yarn, glue it in place, untangle the yarn, glue the new end to the back, and continue wrapping...
 
 
Step Three: The dreaded corner... this was THE hardest part of the whole thing! Since its such a sharp corner/angle when wrapping, the yarn doesn't want to stay in place. So this involved a lot of gluing on the back, and a lot of overlapping near the middle hole area of the B.
 
 
Step Four: Once the "hardest part ever" is finished, the rest is pretty simple! Just keep wrapping alllllllll the way around! Do the top of the B, the entire right side all the way down, the bottom of the B, the bottom left corner (yes this is a difficult area again... just try your best! You had practice on the top left so the bottom left corner is a tiny bit easier) Then wrap it up the rest of the left side until you reach the middle again. I ended by wrapping the center of the B, going through both the top and bottom middle holes. Glue your end in the back, and Ta-Da!


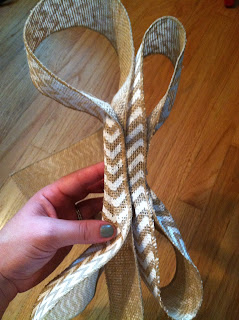
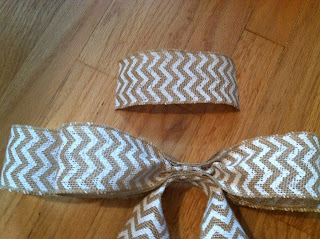
Making the Bow: I made my bow with four different sized pieces of ribbon. I looped the first two pieces around so they formed the "bow part" (shown below). I pinched the middles of each bow and put some got glue in between so they wouldn't loose form.
 
 
Then I hot glued the big bow and the little bow together, joining them at the middle pinched sections.
 
 
Next I cut the piece that hangs from the bows. I pinched the middle and put some glue to hold the form.
 
 
Glue this piece to the bottom of the bows.
 
 
Next, I cut a smaller piece to wrap around the middle of everything, to "finish" it off and make it look like I tied this beautiful bow effortlessly with no glue at all. Tricky tricky right!? :)


When attaching the bow to the letter, I folded up the ends so it looks clean and finished. I first hot glued the ribbon to the back of the letter.
 
 
Then I added some staples to make sure it was secure!
 
 
When done, hang it up and ENJOY! I promise you will get many many compliments! This project was time consuming, but super affordable. And for the couple it was going to? Well worth every minute spent making it! :) Congrats to the newlyweds!


Wednesday, September 4, 2013

We Have New Neighbors!

The house across the street from us just sold, and I am so excited to find out that we have some new neighbors moving in... WITH KIDS!!!! Woot Woot! The youngest of the three children is a little boy just a bit older than Charlie! Most people probably don't get as excited as I am right now about new neighbors, but our block is OLD and BORING! No offense to anyone living on my block.... :) I think there might be a younger couple all the way at the other end of the block, but they never socialize with anyone and I couldn't even tell you what they look like. We are pretty close with the neighbors directly next door to us because they are super friendly, have two younger boys, and have welcomed us to the neighborhood ever since we moved in two years ago. They have also been praying that a family with children would move in across the street, so when we found out the good news, we were all ecstatic! Time to start recruiting for a block party!

I was dying to meet the new neighbors so I decided to make a little "Welcome to the Neighborhood" gift. After doing some research on Pinterest, I decided to just fill a bucket with a ton of household cleaning supplies (things we all need around the house). Some of the other ideas were to bake something, but we all know how my cooking skills are. Luckily, I found all of the (name brand!) items from the dollar store (The Dollar Tree), except the wine! I found a cute little printable tag on Pinterest, and voila! A fabulous "Welcome to the Neighborhood" gift! :)


(In case you were curious, the new neighbors are SO nice, and loved the gift!)

Tuesday, September 3, 2013

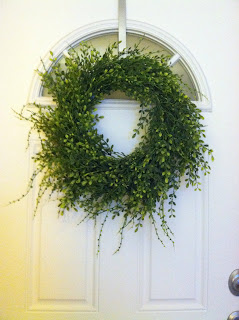
My Fabulous DIY Boxwood Wreath!

So I have ALWAYS wanted a boxwood wreath for our front door. I think they just look so fresh, and go with pretty much any season! When I realized how much they were, I begged Peter to at least plant a boxwood bush in our font yard when we fixed it up last Fall. That didn't happen. So on to plan B! I did a ton of research and finally built up the courage (and energy) to make one myself! I know, I know. "You're a DIYer! Why wasn't that your Plan A?" That's what you're thinking right? I don't know! I have no answers for that! I do not have a green thumb, I kill every plant that anyone ever leaves me responsible for, so maybe the whole "greenery" topic of conversation scared me a little when thinking about making this myself. Anyways, I just went for it! And I think it turned out pretty darn fabulous if I do say so myself! ;) Here was my plan of action....

First, I grabbed an old grapevine wreath I had in the basement. It had some red berries on it and I kind of just ripped them off. :) I did see these at Hobby Lobby for $4.99 and I'm sure you could even get one at Walmart. You might even want to take a chance and try The Dollar Tree! They might have a wire one that would work just as well.


Next I took a trip to Hobby Lobby and went to both the "floral section" and the "greenery/bushes section". Hobby Lobby has some kind of rotation where different sections in the store are half off. During this trip, the floral section was NOT half off, but the greenery/bushes was! I found these boxwood garland bunches for $11.99 each bunch, but since they were half off, they came to 6 bucks each! I bought four bunches to start, and figured I could always return some if I didn't use it all. Just for reference, the code on the tag  is 473942.


Once I spread out my bunches, I basically just stuck one in the wreath and started securing it with these green twist ties. The twist ties were actually harder to find than I thought since most garbage bags now a days have the pull string in them. Our local Jewel doesn't even carry twist ties! I was pretty much freaking out last night in the grocery store at 10:30pm because I really really really wanted to get this wreath DONE! Once I calmed down, I thought to walk over to the floral section and see if they had any kind of green floral wire. On my way there, I passed the produce section... Ding! Ding! Ding! They have these green twist ties for the produce! Duh! :) Now don't go around saying I stole these or anything... When we go grocery shopping we NEVER use the twist ties. We just tie up our bags in a little knot. So I was simply taking all of the twist ties that we never took in the past. :) I'm sure hot glue would be just as sufficient, but I wanted to use twist ties just in case for some crazy reason I decided to take it down and make a new one in the future. I didn't like the commitment of the hot glue... :)


I probably could have just used three bunches, but I wanted a really full effect so I ended up using all four bunches of boxwood. 


Once all the boxwood was attached to the wreath, I came across a bit of a problem when I tried to pick it up! It got a little "droopy" and I didn't like how a lot of the ends were hanging. Solution, you ask? I hung it on the door and used a couple more twist ties to secure the loose "droopy" ends until I was satisfied!


It's still a little droopy, but I kind of love it just like this! As a final touch, I bought some burlap ribbon and made a nice big bow to attach to it! (from Hobby Lobby, also 50% off! So it was only $2.50 for the roll.) In my head I was imagining a linen textured ribbon that has wire along the  edges to make it easier to create the bow and keep it in place, but this will do!


Now I just need to decide which side the bow should stay on! Suggestions? I'm leaning towards the right....  ;)


Updated on September 5th, 2013...

And the winner is.... drum roll please....


The bow on the right! :) 
Thanks for all of your input via email, Facebook, and Instagram!


Father's Day 2013

So for this past Father's Day, I wanted to make it extra special and from the heart! My husband works SO hard just so I can be a stay at home mommy (teaching, coaching, summer pool manager at a Country Club) and I wanted to show him how much we (I) appreciate everything he does for our little family! :) SOOOOO I thought I would throw him a Father's Day Fiesta since he just LOVES Mexican food! I decorated the house with streamers, a piƱata, dressed Charlie and I in sombreros and ponchos (Charlie's was made from a bandana with a hole cut in the middle), played some mariachi band music,  and of course I had authentic Mexican food delivered from a little place down the street! Don't judge. I don't cook. :) Here are some pics from our little fiesta!


On to the presents! Charlie was obviously too young to make anything himself for his Daddy, so I took the liberty of creating something WITH him. :) We did a little photo shoot in Daddy's clothes! 


Last of all, we went to the Father's Day 5K, an annual fundraiser at the school Peter teaches at. What a difference a year makes! Last year the little peanut was still in my tummy! :)